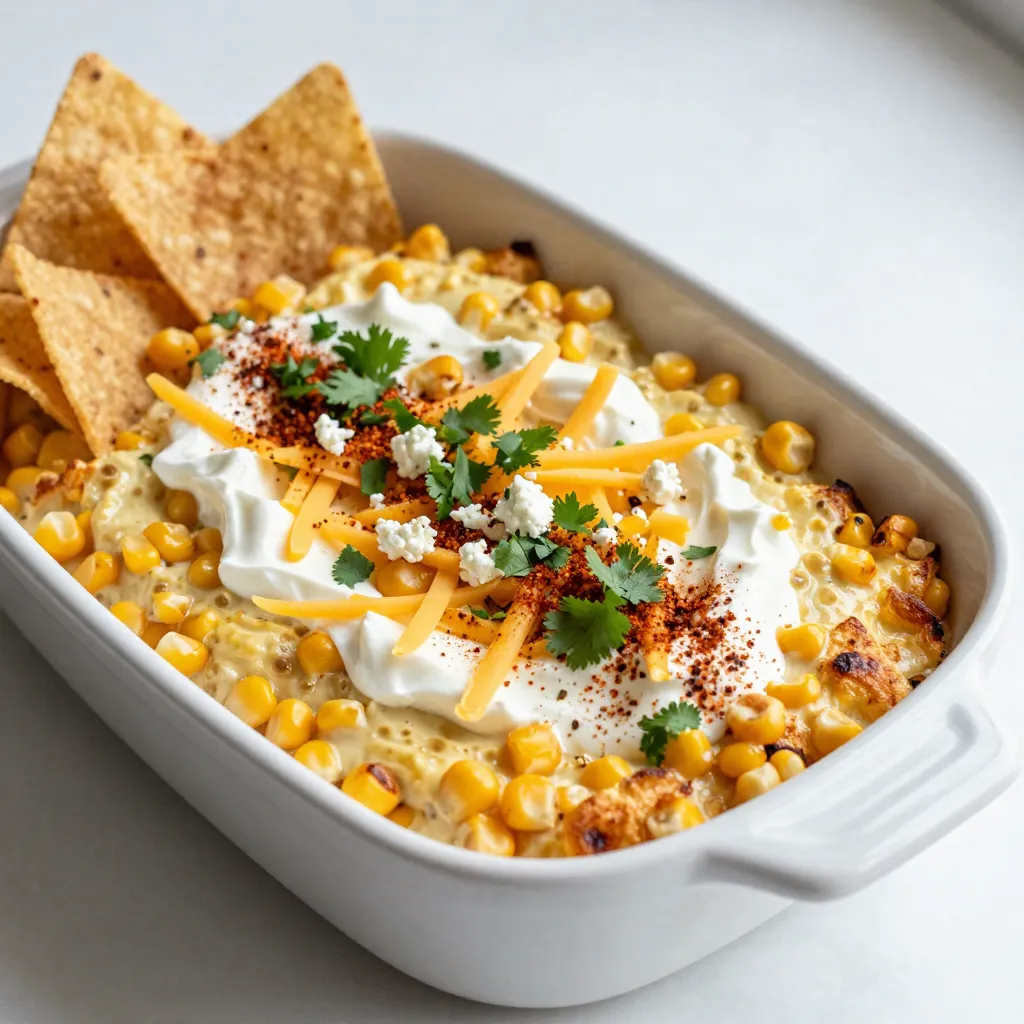
If you’re craving a creamy, cheesy treat, then my Cheesy Mexican Street Corn Dip is a must-try! This flavorful delight packs a punch with fresh corn, rich cheeses, and zesty seasonings. Perfect for parties or a cozy night in, it combines all the bright flavors of Mexican street corn in a dip you’ll adore. Ready to impress your taste buds? Let’s dive into the tasty details!
Why I Love This Recipe
- Flavor Explosion: This dip combines the sweetness of grilled corn with creamy cheeses and zesty lime, creating a flavor profile that’s irresistible.
- Easy to Make: With simple ingredients and straightforward steps, this dip can be whipped up in no time, making it perfect for last-minute gatherings.
- Versatile Dish: Whether served at parties, barbecues, or family dinners, this dip is a crowd-pleaser that complements any occasion.
- Customizable: Feel free to adjust the spices or add your favorite ingredients to make this dip uniquely yours!
Ingredients
To create the perfect Cheesy Mexican Street Corn Dip, you need a mix of fresh corn and dairy components, seasonings, and toppings. Here’s the full list:
List of Ingredients
– Fresh corn and dairy components
– 4 ears of fresh corn, grilled and kernels removed
– 1 cup cream cheese, softened
– 1 cup sour cream
– 1 cup shredded cheddar cheese
– 1/2 cup crumbled cotija cheese
– 1/4 cup mayonnaise
– Seasonings and condiments
– 1 tablespoon lime juice
– 1 teaspoon chili powder
– 1/2 teaspoon garlic powder
– Salt and pepper to taste
– Additional toppings for garnish
– 1/4 cup fresh cilantro, chopped
– Tortilla chips for serving
Using fresh corn makes a big difference. Grilling it adds a nice smoky flavor. The mix of cheeses gives the dip a rich taste. The lime juice adds brightness, while chili powder and garlic powder enhance the flavor. Top it off with chopped cilantro for freshness. Serve with tortilla chips to scoop up this creamy, cheesy delight.

Step-by-Step Instructions
Preparing the Corn
Grilling the corn is the first step. I grill the corn for about 10-15 minutes. I want it to be charred and tender. The grill adds a smoky flavor that really shines in the dip. Once grilled, I let the corn cool slightly. Then, I cut the kernels off the cob using a sharp knife. I make sure to cut close to the cob to get the most kernels. I place the kernels in a mixing bowl for later.
Mixing the Base Ingredients
Next, I mix the base ingredients. In a large bowl, I combine 1 cup of softened cream cheese and 1 cup of sour cream. I stir them until smooth and creamy. Then, I add 1 cup of shredded cheddar cheese and 1/2 cup of crumbled cotija cheese. I also throw in 1/4 cup of mayonnaise for extra creaminess. Stir until everything is well blended and looks delicious.
Final Assembly and Baking
Now comes the fun part—assembling and baking. I add the grilled corn kernels into the cheese mixture. I also include 1 tablespoon of lime juice, 1 teaspoon of chili powder, and 1/2 teaspoon of garlic powder. I mix everything until it is well combined. I season it with salt and pepper to taste. If I want more heat, I can add cayenne pepper or more chili powder.
Next, I transfer the dip to an oven-safe baking dish. I smooth the top with a spatula. I preheat the oven to 350°F (175°C) and bake the dip for 20-25 minutes. I watch for the top to become bubbly and golden brown. Once it’s done, I let it cool slightly before serving. This dip is best enjoyed warm, so I serve it with crispy tortilla chips for dipping.
Tips & Tricks
Achieving the Best Texture
To get the perfect texture, start with room temperature ingredients. This makes mixing easier. I always let my cream cheese soften before using it. It blends well with the sour cream and cheeses. When mixing, use a sturdy spoon or spatula. Stir gently until everything is creamy and smooth. This step is key for a dip that is both rich and fluffy.
Serving Suggestions
Serve this dip warm for the best taste. I love it straight out of the oven. The dip looks great in a baking dish. Add a sprinkle of cilantro and extra chili powder on top. This gives it a pop of color. Pair it with crispy tortilla chips for dipping. Your guests will love this combo!
Customization Options
Feel free to add your favorite ingredients for extra flavor. Diced jalapeños give a nice kick. You can also mix in black beans or diced tomatoes. If you want it spicier, add cayenne pepper or extra chili powder. Adjust the spice to fit your taste. This dip is all about making it yours!
Pro Tips
- Grilling Corn: Ensure the corn is charred for maximum flavor. Rotate the ears every few minutes for even cooking.
- Texture Variation: For added texture, mix in some diced jalapeños or red onions into the dip.
- Cheese Choices: Feel free to experiment with different cheeses. Pepper jack can add a nice kick, while creamier cheeses like mascarpone can make it extra rich.
- Make Ahead: This dip can be prepared a day in advance. Just cover and refrigerate, then bake before serving for a warm treat.
Variations
Vegan Version
You can easily make a vegan version of this dip. For dairy-free choices, use cashew cream instead of cream cheese. Substitute the sour cream with coconut yogurt for a creamy texture. Use vegan mayonnaise for added richness. When it comes to cheese, try vegan cheddar or nut-based cheeses. These options keep the dip tasty and plant-based.
Spicy Version
Want to turn up the heat? Add chopped jalapeños for a fresh kick. You can also mix in a few dashes of hot sauce. For the right spice, choose chili powder or cayenne for a deeper flavor. Adjust the amount based on your heat tolerance. This spicy twist will make your dip stand out.
Cold Version
For a refreshing no-bake dip, start with the grilled corn but skip the baking. Mix all the ingredients in a bowl, then chill it in the fridge for about an hour. This method keeps the flavors bright and crisp. The cold version offers a different taste experience, perfect for hot days or casual gatherings.
Storage Info
How to Store Leftovers
To keep your Cheesy Mexican Street Corn Dip fresh, place it in an airtight container. Make sure to cover it well to avoid drying out. Store your dip in the fridge. It can last for about 3 to 5 days.
Reheating Instructions
When you’re ready to enjoy your dip again, preheat your oven to 350°F (175°C). Place the dip in an oven-safe dish. Heat it for about 15 to 20 minutes, or until it’s warm and bubbly. For the tortilla chips, place them on a baking sheet. Heat them in the oven for about 5 minutes to get them crispy again. This way, they will be perfect for dipping!
Freezing Recommendations
If you want to freeze your dip, it’s best to do it before baking. Place the dip in a freezer-safe container. You can store it for up to 2 months. When you want to eat it, take it out and let it thaw in the fridge overnight. To reheat, bake it at 350°F (175°C) for 25 to 30 minutes. If you freeze it after baking, make sure to cool it first. Thaw it in the fridge and then reheat as mentioned above. Enjoy your dip warm and fresh!
FAQs
Can I make Cheesy Mexican Street Corn Dip ahead of time?
Yes, you can make this dip ahead of time. To prepare it in advance, follow these tips:
– Grill the corn and cut the kernels.
– Mix all the ingredients as directed.
– Place the dip in an oven-safe dish, then cover it tightly.
– Store it in the fridge for up to 24 hours.
– When ready to serve, bake it as instructed.
This way, you save time on the day of your gathering.
What can I serve with Cheesy Mexican Street Corn Dip?
This dip pairs well with several snacks. Here are some ideas:
– Tortilla chips for dipping.
– Fresh veggie sticks like carrots and celery.
– Sliced bell peppers for a crunchy option.
– Crispy pita chips for a different texture.
– Mini tacos for a fun twist.
These options will complement the dip and keep your guests happy.
How spicy is Cheesy Mexican Street Corn Dip?
The spice level is mild to medium. It mainly depends on how much chili powder you use.
To adjust the heat:
– Add cayenne pepper for more spice.
– Toss in diced jalapeños for extra kick.
– Keep it simple with just a touch of chili powder.
This dip can easily fit your taste!
In this blog post, we explored how to make a delicious Cheesy Mexican Street Corn Dip. We covered key ingredients, step-by-step instructions, and helpful tips. You learned about variations to fit different diets and how to store leftovers properly.
In conclusion, making this dip can be easy and fun. Use fresh ingredients and experiment with flavors. Whether you serve it warm or cold, it’s sure to be a hit at your next gathering. Enjoy your dip and impress your guest
<!-- /wp:freefo